Home组件即网站的首页部分,一般作数据大屏,显示推送信息和分类浏览的作用。与Layout部分同理,在Home文件夹下新建index.vue文件和components文件夹,其中index.vue文件依然作为程序的入口
1
2
3
4
5
6
7
8
9
10
11
12
13
14
15
16
17
| <script setup>
import HomeCategory from './components/HomeCategory.vue';
import HomeBanner from './components/HomeBanner.vue';
import HomeNew from './components/HomeNew.vue';
import HomeHot from './components/HomeHot.vue';
import HomeProduct from './components/HomeProduct.vue';
</script>
<template>
<div class="container">
<HomeCategory />
<HomeBanner />
</div>
<HomeNew />
<HomeHot />
<HomeProduct />
</template>
|
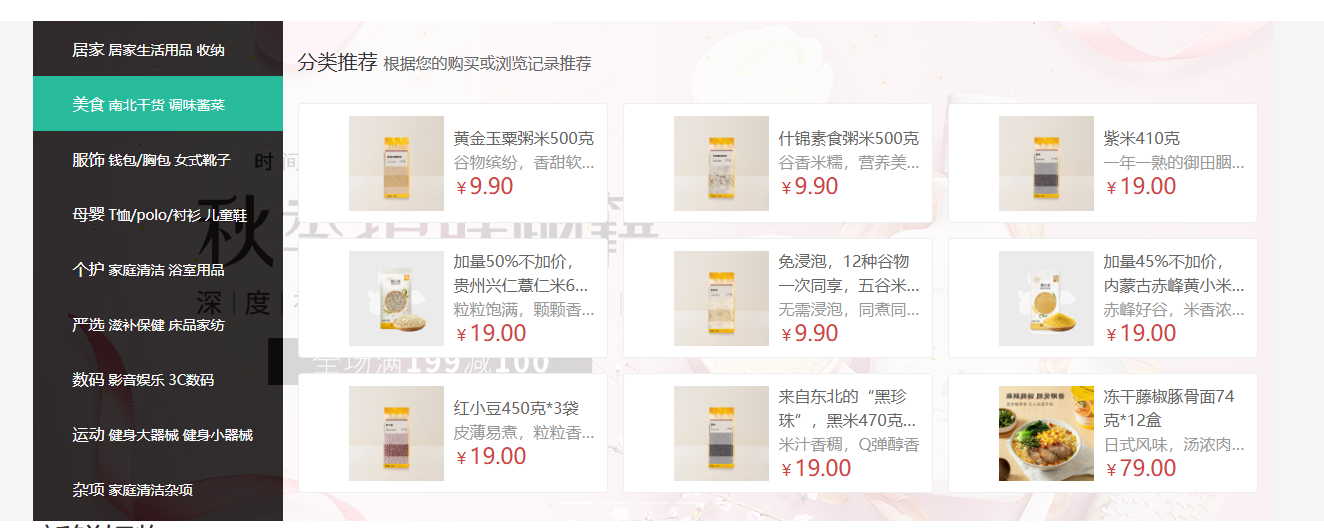
HomeCategory大屏显示类别
该部分在左侧显示类别信息,当鼠标悬停到对应类别上时,在右侧显示对应的商品信息。在components文件夹下新建HomeCategory.vue文件,代码如下
此处的关键样式尾layer部分。当鼠标没有悬浮在上时其display属性为none(不显示),悬浮在上时为block(显示),由此实现相关功能。
banner轮播图
一般的网站首页大屏要么类别,要么轮播,为什么这里两个都有呢?于教学来说无可厚非,但对美观性而言是个灾难。
一般的网站也会在大屏上显示轮播图,显示热点信息。该部分图片不在类别接口中,需要自己重新定义接口。在apis文件夹下新建home.js,vue部分代码点击显示,js部分代码如下
1
2
3
4
5
6
7
8
9
10
11
12
| import httpInstance from "@/utils/http"
export function getBannerAPI(params = []) {
const { distributeSite = 1 } = params
return httpInstance({
url:"home/banner",
params: {
distributeSite
}
})
}
|
此处接受参数params,这个参数是一个对象(若没有传入,则为一个空数组)。并从中解构赋值,提取了一个名为distributeSite属性。若params中没有这个属性或没有定义值,则赋值为1。2的功能在后面会提及,目前只需要用到1。
在components文件夹下新建HomeBanner.vue文件,代码如下
由于element-plus提供了相关组件<el-carousel />和单个项<el-carousel-item />,大大简化了操作,直接调用,并往里面插入从接口中获取的图片就好。
面板封装
GoodsItem组件
在HomeCategory中可以看到以下组件
1
2
3
4
5
6
7
8
| <router-link to="/">
<img :src="i.picture" alt="" />
<div class="info">
<p class="name ellipsis-2">{{ i.name }}</p>
<p class="desc ellipsis">{{ i.desc }}</p>
<p class="price"><i>¥</i>{{ i.price }}</p>
</div>
</router-link>
|
该部分组件在后面的组件中也需要使用,为提高代码复用性可以先行封装好。在components文件夹下新建文件GoodsItem.vue文件。代码如下
可以看到,除了script部分,其他和前面的HomeCategory中的内容基本一样。script部分的内容定义了vue3组件中的props,用于接收父组件中的数据goods。下面的内容定义了goods的类型(对象)和默认值(没有传则为一个空对象)
这样在使用的时候只需要
1
| <goods-item :goods="item" />
|
即可。
但实际上该部件在Home组件下很多地方该用的没用,用了也会有大大小小的问题。其他地方倒是用的挺多。所以为什么不放到src下的components文件夹下呢?
HomePanel组件
“人气商品”和“新鲜好物”模块和后面的分类别组件存在差别,但二者的展示逻辑是一样的。因此该部分的样式用HomePanel封装。在components文件夹下新建文件HomePanel.vue,代码如下
此处的<slot />部分为“插槽”,用于在组件中定义占位符,允许父组件向子组件中传递自定义内容。我们将在后面两个模块的具体设计中看到这点。
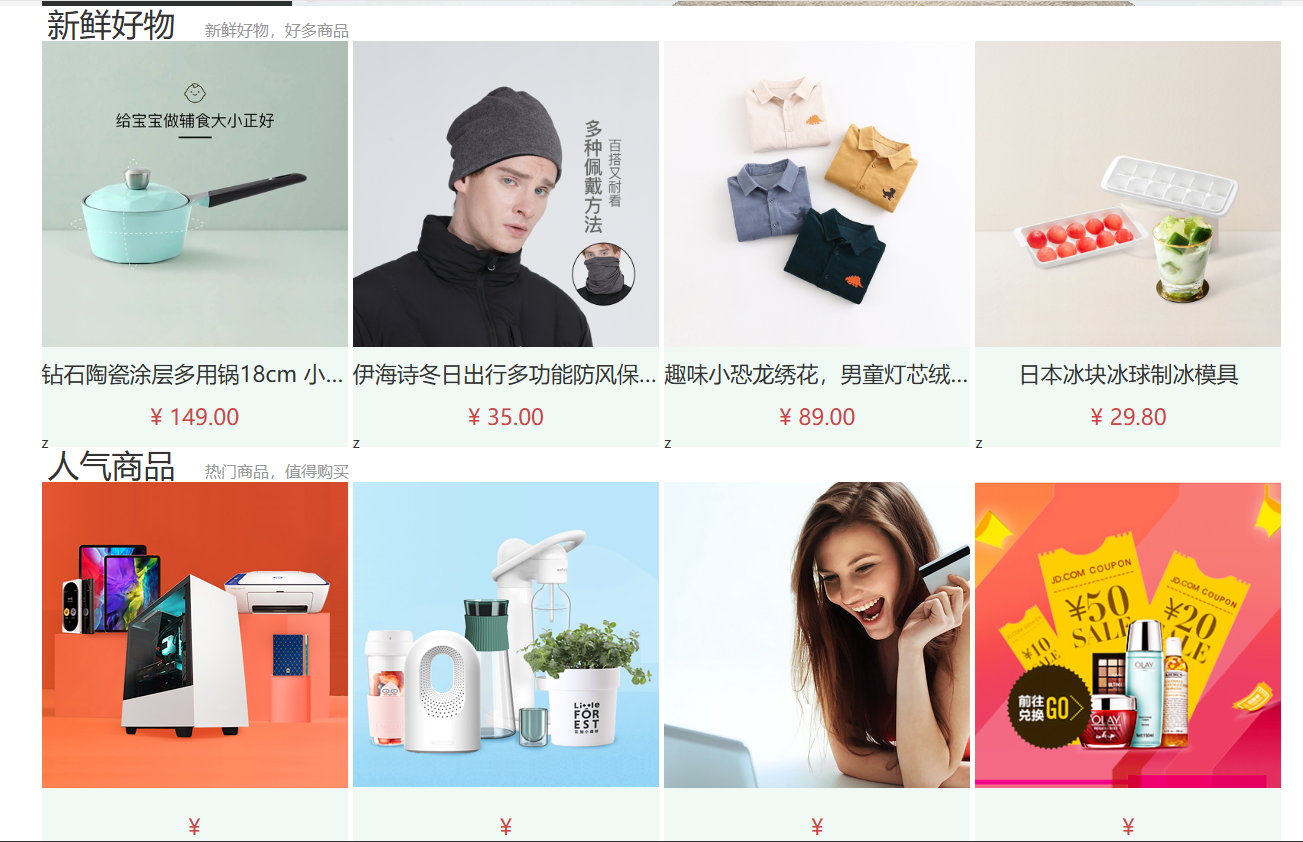
“人气商品”和“新鲜好物”模块
有了前面的铺垫,这两个模块能够较为容易地写出来。首先需要定义接口。在原先的文件home.js下新增两个接口
1
2
3
4
5
6
7
8
9
10
11
| export function findNewAPI() {
return httpInstance({
url:"home/new"
})
}
export function findHotAPI() {
return httpInstance({
url:"home/hot"
})
}
|
在components文件夹下新建文件HomeHot.vue和HomeNew.vue,代码如下
懒加载指令的实现
大多数时候用户并不会翻完网页,因此窗口外的内容不需要全部加载,需要实现图片懒加载组件,以节约请求的资源数。
在directives文件夹下新建文件index.vue,代码如下
1
2
3
4
5
6
7
8
9
10
11
12
13
14
15
16
17
18
19
20
21
| import { useIntersectionObserver } from '@vueuse/core'
export const lazyPlugin = {
install(app) {
app.directive('img-lazy', {
mounted(el, binding) {
const { stop } = useIntersectionObserver(
el,
([{ isIntersecting }]) => {
if(isIntersecting) {
el.src = binding.value
stop()
}
},
)
}
})
}
}
|
通过install(app),注册一个名为img-lazy的vue插件,用于实现懒加载指令。其中的mounted狗子用于在绑定的元素被插入到DOM时触发,获取参数el(绑定的DOM元素,即需要懒加载的图片)和binding(指令的值,通常是图片的URL),后面的useIntersectionObserver是vueuse中的方法,用于检测是否进入视口,当进入视口(isIntersecting为true时),将图片的url赋值给el.src,触发图片加载。加载完成后,调用从上面的解构出来的stop方法,停止检测,防止重复触发。
最后需要在main.js中注册组件
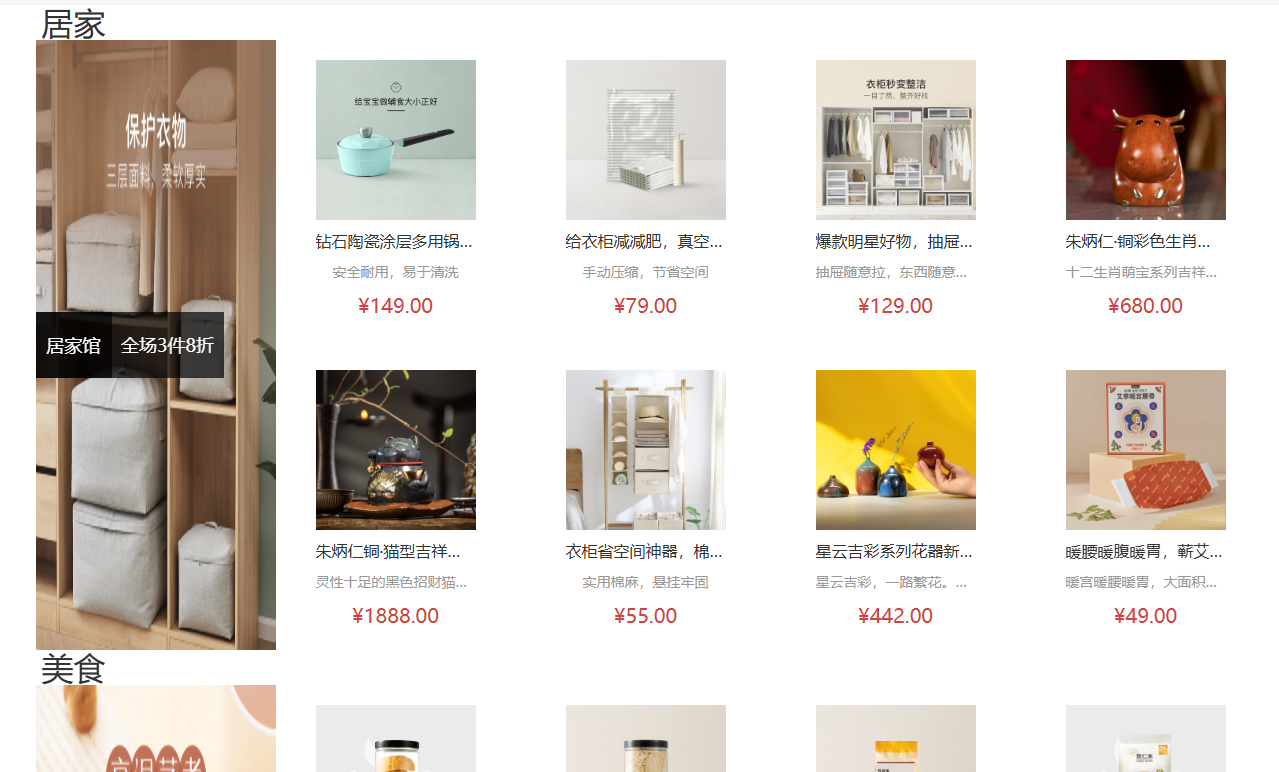
产品列表实现
现在的推送流网站都不会单纯地放产品列表上来了,而是推送定制化内容。但其中的复用思想还是一致的
接在“人气商品”和“新鲜好物”模块后的是产品列表的实现,这是前面封装组件的集大成。在原先的文件home.js下新增接口
1
2
3
4
5
| export function getGoodsAPI() {
return httpInstance({
url:"home/goods"
})
}
|
在components文件夹下新建文件HomeProduct.vue,代码如下
源码
HomeCategory
1
2
3
4
5
6
7
8
9
10
11
12
13
14
15
16
17
18
19
20
21
22
23
24
25
26
27
28
29
30
31
32
33
34
35
36
37
38
39
40
41
42
43
44
45
46
47
48
49
50
51
52
53
54
55
56
57
58
59
60
61
62
63
64
65
66
67
68
69
70
71
72
73
74
75
76
77
78
79
80
81
82
83
84
85
86
87
88
89
90
91
92
93
94
95
96
97
98
99
100
101
102
103
104
105
106
107
108
109
110
111
112
113
114
115
116
117
118
119
120
121
122
123
124
125
126
127
128
129
130
131
132
133
134
135
136
137
138
139
140
141
142
143
144
145
146
147
148
149
150
151
152
| <script setup>
import { useCategoryStore } from '@/stores/category'
const categoryStore = useCategoryStore()
</script>
<template>
<div class="home-category">
<ul class="menu">
<li v-for="item in categoryStore.categoryList" :key="item.id">
<router-link to="/">{{ item.name }}</router-link>
<router-link v-for="i in item.children.slice(0, 2)" :key="i" to="/">{{ i.name }}</router-link>
<div class="layer">
<h4>分类推荐 <small>根据您的购买或浏览记录推荐</small></h4>
<ul>
<li v-for="i in item.goods" :key="i.id">
<router-link to="/">
    <img :src="i.picture" alt="" />
    <div class="info">
        <p class="name ellipsis-2">{{ i.name }}</p>
        <p class="desc ellipsis">{{ i.desc }}</p>
        <p class="price"><i>¥</i>{{ i.price }}</p>
    </div>
</router-link>
</li>
</ul>
</div>
</li>
</ul>
</div>
</template>
<style scoped lang='scss'>
.home-category {
width: 250px;
height: 500px;
background: rgba(0, 0, 0, 0.8);
position: relative;
z-index: 99;
.menu {
li {
padding-left: 40px;
height: 55px;
line-height: 55px;
&:hover {
background: $xtxColor;
}
a {
margin-right: 4px;
color: #fff;
&:first-child {
font-size: 16px;
}
}
.layer {
width: 990px;
height: 500px;
background: rgba(255, 255, 255, 0.8);
position: absolute;
left: 250px;
top: 0;
display: none;
padding: 0 15px;
h4 {
font-size: 20px;
font-weight: normal;
line-height: 80px;
small {
font-size: 16px;
color: #666;
}
}
ul {
display: flex;
flex-wrap: wrap;
li {
width: 310px;
height: 120px;
margin-right: 15px;
margin-bottom: 15px;
border: 1px solid #eee;
border-radius: 4px;
background: #fff;
&:nth-child(3n) {
margin-right: 0;
}
a {
display: flex;
width: 100%;
height: 100%;
align-items: center;
padding: 10px;
&:hover {
background: #e3f9f4;
}
img {
width: 95px;
height: 95px;
}
.info {
padding-left: 10px;
line-height: 24px;
overflow: hidden;
.name {
font-size: 16px;
color: #666;
}
.desc {
color: #999;
overflow: hidden;
}
.price {
font-size: 22px;
color: $priceColor;
i {
font-size: 16px;
}
}
}
}
}
}
}
&:hover {
.layer {
display: block;
}
}
}
}
}
</style>
|
HomeBanner
1
2
3
4
5
6
7
8
9
10
11
12
13
14
15
16
17
18
19
20
21
22
23
24
25
26
27
28
29
30
31
32
33
34
35
36
37
38
39
| <script setup>
import { getBannerAPI } from '@/apis/home'
import { onMounted, ref } from 'vue'
const bannerList = ref([])
const getBanner = async () => {
const res = await getBannerAPI()
bannerList.value = res.result
}
onMounted(() => getBanner())
</script>
<template>
<div class="home-banner">
<el-carousel height="500px">
<el-carousel-item v-for="item in bannerList" :key="item.id">
<img :src="item.imgUrl" alt="">
</el-carousel-item>
</el-carousel>
</div>
</template>
<style lang="scss" scoped>
.home-banner {
width: 1240px;
height: 500px;
position: absolute;
left: 0;
top: 0;
z-index: 98;
img {
width: 100%;
height: 500px;
}
}
</style>
|
组件封装
GoodsItem
1
2
3
4
5
6
7
8
9
10
11
12
13
14
15
16
17
18
19
20
21
22
23
24
25
26
27
28
29
30
31
32
33
34
35
36
37
38
39
40
41
42
43
44
45
46
47
48
49
50
51
52
53
54
55
| <script setup>
defineProps({
goods: {
type: Object,
default: () => { }
}
})
</script>
<template>
<RouterLink to="/" class="goods-item">
<img v-img-lazy="goods.picture" alt="">
<p class="name ellipsis">{{ goods.name }}</p>
<p class="desc ellipsis">{{ goods.desc }}</p>
<p class="price">¥{{ goods.price }}</p>
</RouterLink>
</template>
<style scoped lang="scss">
.goods-item {
display: block;
width: 220px;
padding: 20px 30px;
text-align: center;
transition: all .5s;
&:hover {
transform: translate3d(0, -3px, 0);
box-shadow: 0 3px 8px rgb(0 0 0 / 20%);
}
img {
width: 160px;
height: 160px;
}
p {
padding-top: 10px;
}
.name {
font-size: 16px;
}
.desc {
color: #999;
height: 29px;
}
.price {
color: $priceColor;
font-size: 20px;
}
}
</style>
|
HomePanel
1
2
3
4
5
6
7
8
9
10
11
12
13
14
15
16
17
18
19
20
21
22
23
24
25
26
27
28
29
30
31
32
33
34
35
36
37
38
39
40
41
42
43
44
45
46
47
48
49
50
| <script setup>
defineProps({
title: {
type: String,
},
subTitle: {
type: String,
}
})
</script>
<template>
<div class="home-panel">
<div class="container">
<div class="head">
<h3>{{ title }} <small>{{ subTitle }}</small></h3>
</div>
<slot></slot>
</div>
</div>
</template>
<style scoped lang="scss">
.home-panel {
background-color: #fff;
.head {
padding: 40px, 0;
display: flex;
align-items: flex-end;
h3 {
flex: 1;
font-size: 32px;
font-weight: normal;
margin-left: 6px;
height: 35px;
line-height: 35px;
small {
font-size: 16px;
color: #999;
margin-left: 20px;
}
}
}
}
</style>
|
两个模块
HomeHot.vue
1
2
3
4
5
6
7
8
9
10
11
12
13
14
15
16
17
18
19
20
21
22
23
24
25
26
27
28
29
30
31
32
33
34
35
36
37
38
39
40
41
42
43
44
45
46
47
48
49
50
51
52
53
54
55
56
57
58
59
60
61
62
63
64
65
66
| <script setup>
import HomePanel from './HomePanel.vue';
import { findHotAPI } from '@/apis/home';
import { onMounted, ref } from 'vue';
const hotList = ref([]);
const getHotList = async () => {
const res = await findHotAPI();
hotList.value = res.result
}
onMounted(() => getHotList())
</script>
<template>
<HomePanel title="人气商品" sub-title="热门商品,值得购买">
<ul class="goods-list">
<li v-for="item in hotList" :key="item.id">
<router-link to="/">
<img v-img-lazy="item.picture" alt="" />
<p class="name">{{ item.name }}</p>
<p class="price">¥ {{ item.price }}</p>
</router-link>
</li>
</ul>
</HomePanel>
</template>
<style scoped lang='scss'>
.goods-list {
display: flex;
justify-content: space-between;
height: 406px;
li {
width: 306px;
height: 406px;
background: #f0f9f4;
transition: all .5s;
&:hover {
transform: translate3d(0, -3px, 0);
box-shadow: 0 3px 8px rgb(0 0 0 / 20%);
}
img {
width: 306px;
height: 306px;
}
p {
font-size: 22px;
padding-top: 12px;
text-align: center;
text-overflow: ellipsis;
overflow: hidden;
white-space: nowrap;
}
.price {
color: $priceColor;
}
}
}
</style>
|
HomeNew.vue组件和上面的代码基本一致,这里不再上源码
产品列表
1
2
3
4
5
6
7
8
9
10
11
12
13
14
15
16
17
18
19
20
21
22
23
24
25
26
27
28
29
30
31
32
33
34
35
36
37
38
39
40
41
42
43
44
45
46
47
48
49
50
51
52
53
54
55
56
57
58
59
60
61
62
63
64
65
66
67
68
69
70
71
72
73
74
75
76
77
78
79
80
81
82
83
84
85
86
87
88
89
90
91
92
93
94
95
96
97
98
99
100
101
102
103
104
105
106
107
108
109
110
111
112
113
114
115
116
117
118
119
120
121
122
123
124
125
126
127
128
129
130
131
132
133
| <script setup>
import { onMounted, ref } from 'vue';
import HomePanel from './HomePanel.vue'
import { getGoodsAPI } from '@/apis/home'
import GoodsItem from './GoodsItem.vue';
const goodsProduct = ref([])
const getGoods = async () => {
const res = await getGoodsAPI()
goodsProduct.value = res.result
}
onMounted(() => getGoods())
</script>
<template>
<div class="home-product">
<HomePanel :title="cate.name" v-for="cate in goodsProduct" :key="cate.id">
<div class="box">
<RouterLink class="cover" to="/">
<img v-img-lazy="cate.picture" />
<strong class="label">
<span>{{ cate.name }}馆</span>
<span>{{ cate.saleInfo }}</span>
</strong>
</RouterLink>
<ul class="goods-list">
<li v-for="goods in cate.goods" :key="goods.id">
<GoodsItem :goods="goods" />
</li>
</ul>
</div>
</HomePanel>
</div>
</template>
<style scoped lang='scss'>
.home-product {
background: #fff;
margin-top: 20px;
.sub {
margin-bottom: 2px;
a {
padding: 2px 12px;
font-size: 16px;
border-radius: 4px;
&:hover {
background: $xtxColor;
color: #fff;
}
&:last-child {
margin-right: 80px;
}
}
}
.box {
display: flex;
.cover {
width: 240px;
height: 610px;
margin-right: 10px;
position: relative;
img {
width: 100%;
height: 100%;
}
.label {
width: 188px;
height: 66px;
display: flex;
font-size: 18px;
color: #fff;
line-height: 66px;
font-weight: normal;
position: absolute;
left: 0;
top: 50%;
transform: translate3d(0, -50%, 0);
span {
text-align: center;
&:first-child {
width: 76px;
background: rgba(0, 0, 0, 0.9);
}
&:last-child {
flex: 1;
background: rgba(0, 0, 0, 0.7);
}
}
}
}
.goods-list {
width: 990px;
display: flex;
flex-wrap: wrap;
li {
width: 240px;
height: 300px;
margin-right: 10px;
margin-bottom: 10px;
text-align: center;
&:nth-last-child(-n + 4) {
margin-bottom: 0;
}
&:nth-child(4n) {
margin-right: 0;
}
.price {
color: $priceColor;
}
}
}
}
}
</style>
|